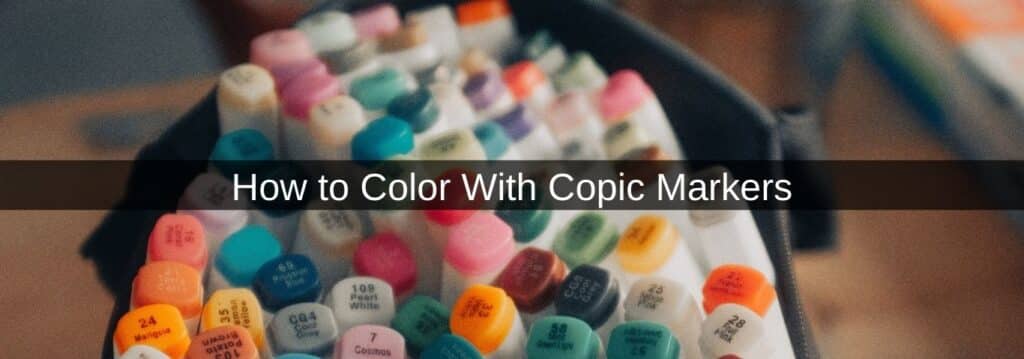
How to Color With Copic Markers
Have you been having a hard time trying to color with Copic markers? If so, you may find the tutorial below useful.
By the end, you’ll have a better idea about the different methods involved to improving your coloring with Copic markers to enhance your artwork.
Preparation
Before we get onto the coloring methods, make sure that you have everything you need. Here’s a quick checklist:
- Sketching paper
- Copic markers
- Gel pens
- Lining pens
Once you have these items ready, move on to the next steps.
Ways to Color With Copic Marker Tips
For starters, you need to make sure that you pick colors that work well together depending on the type of art that you’re creating. The base colors that you choose will make it easier to shade edges and fill designs.
When you first start a project, be sure that you have your primary colors selected. Once you’ve established the main colors that will be used, you can move on to selecting various shades of the same color family.
To organise your markers from the lightest shade to a darker shade, you can scribble them on a scrap piece of paper to make the shades easier to distinguish.
- Be sure to start shading your artwork with lighter shades of Copic markers.
- Once you’ve added the lighter shades, begin adding the darker shades to your work.
- For example, if you’re drawing a portrait, you’d start with the lighter skin tones before moving on to the dark skin with colors that are shades darker.
- You can then locate areas of your artwork that require more depth.
- Begin using a darker color and blending it in with lighter shades to add depth.
- You can always go back to using a lighter shade over the previously shaded areas to add more shading details.
- You could also use a colorless blender to add color saturation. These are great for blending light shades with the darkest areas to make your image look more detailed.
Highlighting
- Once you’re happy with your shading, you can add some highlights.
- Use a white gel pen to gently highlight specific areas of your work.
- This can add an excellent new dimension of line art to your designs.
Inking
- If you want to enhance the outlines of your design, you can add lines to it.
- Use a fine-tip pen and go over the outlines of your work once the previous ink has dried.
- It’s best to always start by adding thin lines. This is because it allows you to be more accurate and follow the existing lines to create clean outlines.
Conclusion
After reading through our tutorial, we hope that you’re feeling more assured about how to implement Copic marker techniques into your painting work. The more you practice with a Copic pen, the better your work will become!
Practice blending with just two colors, to begin with. Once you feel more confident and develop your skills, you can begin to layer it and start coloring with more Copics.
FAQs
Should you color quickly with Copic markers?
Yes, to achieve the best results and artwork that’s free from streaks, it’s best to color areas in quickly.
What motion is best to use when coloring pages?
We recommend focusing on one area at a time and using a circular motion whilst coloring to avoid streaks and keep the colors even. Start with small circles and gradually make them bigger.
Avoid using zig-zag strokes as that’s more likely to cause you to over-blend and create unwanted streaks in your drawing. Instead, use circular motions to create textures for better-quality artwork.
Affiliate Disclosure
In compliance with the FTC guidelines, please assume the following about all links, posts, photos and other material on this website: Any/all of the links on this website are affiliate links of which The Big Red Illustration Agency receives a small commission from sales of certain items, but the price is the same for you. www.bigredillustrationagency.com is a participant in the Amazon Services LLC Associates Program, an affiliate advertising program designed to provide a means for sites to earn advertising fees by advertising and linking to Amazon.com & Amazon.co.uk. Pages on this site may include links to Amazon and its affiliate sites on which the owner of this website will make a referral commission.
FULL TERMS HERE Cookie preferences: cookie preferences
Written By Adam Rushton
Adam has made a name for himself in the illustration industry and is a passionate blogger and writer on the subject of art, illustration and graphic design.
His artwork has been featured in countless publications and used for very well-known media projects. As a professional illustrator for over 20 years, Adams media outlets, a wealth of knowledge, and experience enable him to consult and advise artists and illustrators in this country (from York and Manchester to Southampton and London) and all over the world.


