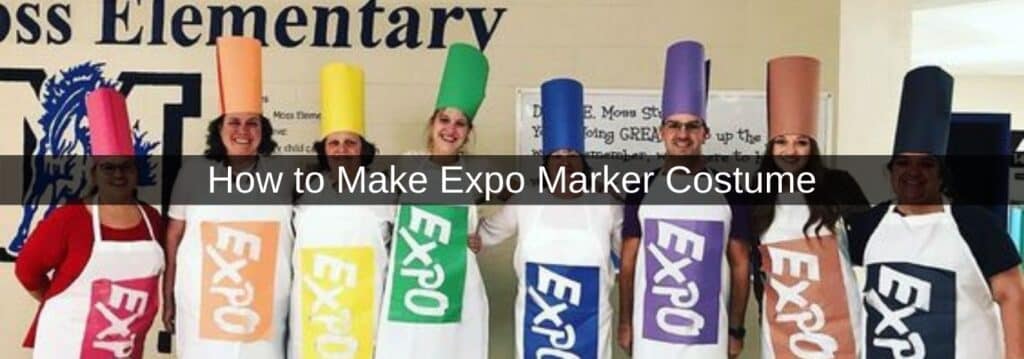
How to Make Expo Marker Costume
Thinking of a costume idea for birthday parties or Halloween can be exciting as it allows you to let your creativity run wild. If you haven’t decided on a birthday or Halloween costume idea and you’re running out of time, this guide could be just what you’re looking for.
The process from start to finish is quick and it can be a fun activity for you and your kid. However, making your own Halloween costume can feel daunting.
Well, this post outlines the step-by-step process to make an Expo marker Halloween costume. It includes simple materials and it’s unlikely that anyone else will turn up dressed as permanent markers on the night.
Preparation
- Search for the permanent marker logo online, save and print it on a piece of paper. You can use two pages that contain two letters each.
- When it comes to a guy or a woman, the construction paper should be 2 x 18” and for children, it should be 9 x 12” in size.
- Make sure that the colour of the paper matches the paint that you’re looking to use.
- Next, find a workspace and cover it with newspaper to avoid damaging your furniture.
- If you’re working as a team, make sure that everyone has scissors, paint, paintbrushes, rulers, tape, and glue.
Making the Costume Marker Body Design
- Use the stencil and place it over the white apron using a pin on each corner to keep it in place. Make sure that you’ve centred the logo on the apron.
- Start tracing the Expo logo letters with a pencil. Then, use a ruler and your pencil to draw a rectangle shape around the letters.
- You’ll need to change the measurement of the rectangle size according to how large the apron is. Anywhere between 1-2” away from the letters works great.
- Grab your paintbrushes and get creative by painting around the outside of the logos that you just made.
- Once you’re done, leave the paint to dry for a while by leaving it where it is or putting it up to hang.
Making the Costume Marker Cap
- Whilst you wait for the marker body to dry, you can start creating the cap.
- You’ll wear the cap as a hat and it includes a tapered cone and a cylinder shape on the inside.
- For the tapered cone, measure the head of the person who will be wearing it. You can then look online on YouTube for inspiration for drawing a pattern for the cone.
- When you’ve drawn the pattern, cut them out and paste both ends together.
- For the interior cylinder, use the measurements from the person’s head to cut construction paper that will fit the circumference of their head.
- The trick is making sure that the height of the paper is longer than the outside whilst keeping the long sides of the paper the same length.
- Glue the interior and outer sections of the hat by placing it on the person’s head. Pull the interior cylinder together with the tapered cone and glue to edges that meet.
Conclusion
After reading through our post on the details of how to create Expo marker costumes, we hope that you’re feeling more confident about creating the costume for yourself. The materials needed are simple and you can have these outfits made pretty quickly.
Regardless of whether you’re attending a Halloween party or a birthday party, you and your kids can have a lot of fun making these costumes.
You can also get super creative with your ideas when choosing markers for your happy Halloween or birthday party. For example, you could incorporate ribbon and other dress ideas to make your Halloween costumes stand out. Bright colours, such as orange would stand out in a photo or video.
FAQs
Can kids make Expo marker Halloween costumes?
Yes, kids and adults can use this tutorial as long as you’re there to supervise and teach them. Your children can have fun with their friends when making these birthday or Halloween costumes!
Affiliate Disclosure
In compliance with the FTC guidelines, please assume the following about all links, posts, photos and other material on this website: Any/all of the links on this website are affiliate links of which The Big Red Illustration Agency receives a small commission from sales of certain items, but the price is the same for you. www.bigredillustrationagency.com is a participant in the Amazon Services LLC Associates Program, an affiliate advertising program designed to provide a means for sites to earn advertising fees by advertising and linking to Amazon.com & Amazon.co.uk. Pages on this site may include links to Amazon and its affiliate sites on which the owner of this website will make a referral commission.
FULL TERMS HERE Cookie preferences: cookie preferences
Written By Adam Rushton
Adam has made a name for himself in the illustration industry and is a passionate blogger and writer on the subject of art, illustration and graphic design.
His artwork has been featured in countless publications and used for very well-known media projects. As a professional illustrator for over 20 years, Adams media outlets, a wealth of knowledge, and experience enable him to consult and advise artists and illustrators in this country (from York and Manchester to Southampton and London) and all over the world.


