
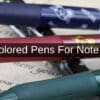
Calligraphy Pens
Top 10 Calligraphy Pens 2021 US
Ever since I was a little kid, I’ve wanted to be involved in illustration. I attended art college once I graduated High School, and from there, I got my degree in University before moving on to work for Hallmark Cards.
After spending several years with Hallmark, I decided to go freelance so that I could bring my knowledge and expertise to a wider audience on my terms. Part of that expertise is discussing the best calligraphy pens for scriptwriting.
Now, don’t get me wrong, I’m not a calligrapher; I’m an illustrator. Lettering and fountain pens are not my day-to-day experience. That being said, over the years of doing illustration, I have had to do some lettering and writing for various pieces, so I do know a thing or two about the best calligraphy pens for professionals to use.
Let me preface all of this by saying that while writing with calligraphy tools seems romantic; it’s actually incredibly different to learn. There are a bunch of different nib sizes, ink types, nib types, as well as a ton of techniques to learn before you’re able to develop a consistently impressive calligraphy style.
If you’re interested in simply having a more impressive tool to write with, or if you want to bring some romanticism into your work, get a fountain pen. Fountain pens hold ink cartridges in them, allowing you to use them as normal writing pens. On the other hand, calligraphy pens are built to allow artists to customize their lettering to a professional standard.
Disclaimer – This website contains affiliate links. If you find the information useful, click on a product link and make a purchase, a small commission will be earned by Big Red Illustration
** FEATURED PENS **
How Do Calligraphy Pens Work?
Calligraphy pens work by utilizing different calligraphy nibs to control your pen’s containment and release of ink. This results in artists gaining the ability to control width, flow and shape more accurately than with a traditional ballpoint or gel ink pen.
The differences between fountain pens and calligraphy pens can, at times, be very minimal. In truth, it’s not incorrect to say that fountain pens are a type of calligraphy pen. However, while suitable for script lettering work, fountain pens don’t deliver the same kinds of results as a pen specifically designed for that purpose.
As well as fountain pens, other types of calligraphy pens are used by professional artists. Dip pens, for example, are popular for lettering. However, using pens that you actually dip into an inkpot is an outdated practice that most professional calligraphers don’t utilize anymore.
That’s just two of the different calligraphy pens available, but there are actually four different types overall that you have the choice of picking. Some of these types are better for beginners than others, so take your time deciding which category you want.
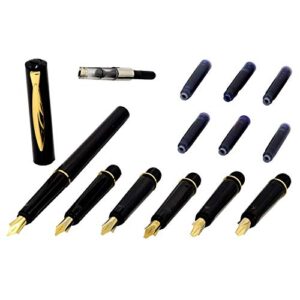
- Fountain Pens.
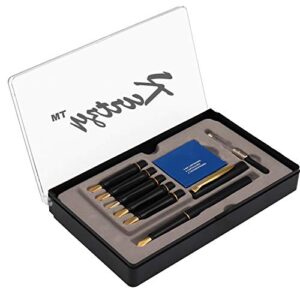
We’ve already talked a little bit about fountain pens. These are typically used by both intermediate and advanced calligraphers, with beginners tending to stay away from them. That being said, these pens are great for general writing as well as script lettering. They are cartridge loaded, too, making them last longer than other types.
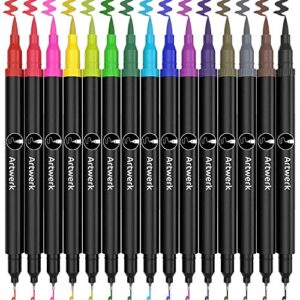
- Felt Tip Pens.
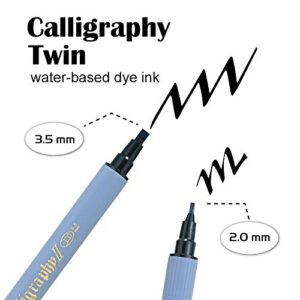
This type of calligraphy pen is more popular among beginner artists that have just started out learning different calligraphy styles. These pens are way more affordable than other professional calligraphy pens depending on what brands you buy. They are also easier to use and don’t require you to prepare your ink before use. That being said, these pens run out of ink faster than other tools and can bleed through your paper. For that reason, you should only use felt tip pens for practice or as a starting point and not on any important documents or art pieces.
- Dip Pens.
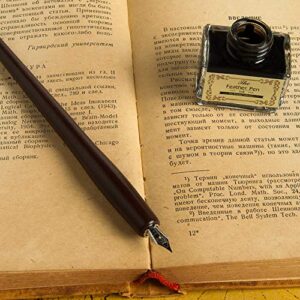
Calligraphy dip pens are used by professional artists and are not designed for beginners. That being said, beginners can use them with enough time and practice, although by that point, they’re not going to be beginners anymore.
Dip pens are arguably the most complicated type of calligraphy markers available. It uses a three-component design that is made up of the handle, the nib, and the reservoir. This gives artists access to a greater range of calligraphy styles and scripts when using them and makes it a much more expensive tool to buy.
This is the best calligraphy pen type, but also the most complicated. If you’re new to the world of calligraphy, you should probably stay away from these. These pens need to be drip-fed ink rather than using a cartridge, making lettering an extensively long experience.
- Brush Pens.
Brush pens are old-school calligraphy tools and are exactly what it sounds like. These pens have flex nibs, or brush-ends, made from sable or nylon that allows them to act more like a paintbrush than a traditional calligraphy pen.
This has a number of advantages to it. First and foremost, it allows artists to blend calligraphy with traditional art techniques. You use the tool more like a brush than a pen, meaning you have far more control over it. This pen-type requires you to dip it into ink, meaning beginners should probably steer clear of these, as well. Although you can get models that take ink cartridges, those tend to be smaller brush pens than the ink-dipping alternative.
A brush pen is the best calligraphy pen type for wall lettering. If you order a calligrapher to do something like a quote on your wall, chances are they’re bringing a brush pen calligraphy set.
How Do I Use Calligraphy Pens?
A pen calligraphy set is a tool that enables you to hone a certain skill. It’s not something that you buy and learn to use. You need to actively work on your calligraphy skills in order to use calligraphy pens effectively.
If you are new to calligraphy products and you want to help improve your letters and script, there are a few things you can keep an eye on as your practice.
First and foremost, you need to know how to load calligraphy inks into your pen. Unless you’re using brush pens, you’re going to be working with ink cartridges that are kept inside of the pen.
The method of ink application changes from pen type to pen type, so make sure you’re using the right method for whatever products you’re using.
For Fountain Pens:
- Uncap your pen and turn the barrel clockwise to separate it from the compartment that houses your nib.
- You’re going to have to attach your ink cartridge to the nib. Remove any empty cartridge from the inside of the pen, and get your new one ready. Push it inside the pen down into the compartment that houses your nib, being sure to push the narrow end of the cartridge in first.
- You should hear a small click as the nib connects to your cartridge, letting you know that the ink has been successfully changed.
For Dip Pens:
- You’re going to need to reload the ink in the pen after every few letters, so be aware of that before you start.
- To refill most dip pens, you’re not going to be using ink cartridges. Instead, you’re going to be using a dropper to move ink from a pot into the reservoir of the pen.
- Holding the pen horizontally, take the ink in your dropper and slowly apply it to the reservoir.
- That’s all. Just make sure you get the ink flowing on some throwaway paper before you start working on your main letters again and keep the dropper handy for your next ink reload.
Once you know how to refill the ink in your calligraphy products, you’re almost ready to start practicing your writing. However, there’s one more bit of prep that you need to get out of the way, and that’s what paper you’re using.
The problem with using the paper that you’re stolen from the copier is that your ink is going to bleed and tear right through that. Calligraphy ink product is heavy-duty, meaning it’s going to destroy any flimsy old paper.
Instead, make sure you’re practicing your letters on thick card paper or dedicated calligraphy paper. If you want to go the extra mile, you can even get calligraphy product paper that has lines and margins to help you practice the size and shapes of your letters.
Just stock up on as many sheets as you can. These products are more expensive than normal paper, sure, but you’re not going to end up taking out a second mortgage to buy some by any means.
After that, you’re ready to start writing, almost. If you’re using a brush or a dip pen, you should try to do your writing on a sloped surface. It’s not too hard to make one of these on your desk at home with a bit of ingenuity.
Okay, now you’re ready to start writing:
- You’re going to have to make sure that your area is stable and doesn’t move about as you right. The nibs on your pen are sensitive, so even one slight hand or table movement can cause it to make a mess. To help with this, make sure your page is lined up straight and tape down the corners. This is going to help keep the page steady as the nib, and your hand glides over it.
- Now you’re ready to practice basic lines. Yep, you need to know how to do the basics before you jump into letters. You wouldn’t dive in the deep end if you couldn’t swim. First, practice doing basic downward strokes. Experiment with different pressures and angles to change the direction of your nib, therefore changing the calligraphy scripts you get.
- There is a lot of technique and theory for you to learn here. We would be here all day if I were to cover it, and I’m also not a professional calligrapher, so I would recommend that, if you want to take calligraphy seriously, you pick up some technical books on the subject Calligraphy Books
- Once you’re able to do downward strokes with different calligraphy scripts, styles, and thicknesses, you can start moving onto different directions and patterns. The more you practice, the better the muscle memory in your hand becomes at controlling the nib on your pens.
That’s all there really is to using a calligraphy pen. It’s a complicated process that requires you to learn a new skill rather than picking up a pen, an instruction book, and getting to work.
Calligraphy Pens for the Beginner Artist
As a beginner, you’re got a long road ahead of you. It doesn’t matter if you want to learn calligraphy to do your wedding invitations or to pursue it professionally; you’re going to have to put in some hard work.
Rome wasn’t built in a day, and it also wasn’t built with hammers and stone. It was people that built Rome, and that’s the same thing with your calligraphy markers. The tools only take you so far; it’s the skill of the hand wielding them that makes the difference.
That being said, calligraphy markers are still great tools that I have an unusual fascination with collecting. It’s also a type of pen that has a lot of variables that beginners can get wrong, so I’m going to help you pick out some calligraphy pens for yourself if you’re a beginner.
What to Look for if You’re Buying Calligraphy Pens
If you’re buying calligraphy markers, there is a whole host of things to consider. There are different color selection ink, nib types, storage tin options, pages, and so much more.
Style of Pen
We’ve already talked about the four different styles of pens earlier in this post. For beginners, I recommend you stick with felt tip pens. This pen-type offers beginners the easiest and most affordable way to practice without spending a fortune on ink cartridge refills. You’re not going to get results as you’d get with high-end brands that make dip pens, but it is a way for you to improve while not breaking the bank buying tools.
If you have a little more experience under your belt, then consider upgrading to a fountain pen. This is going to help you post some quality results while still not being as difficult to use as dip pens.
Speaking of dip pens, these are the tip of the calligraphy tools mountain. Your progression should follow this three-step layout. Pacing yourself like this offers you the best chance to actively improve your results, as well as gradually increasing the quality of your tools.
A brush pen offers an entirely different experience to the other tools in my experience, so I like to treat it as an alternative to dip pens, but consider the other three types the main focus of calligraphy professionals.
Type of Nibs
Nibs, nibs, nibs. Burn that word into your brain because it’s the be-all and end-all of calligraphy pens. Sure, your hand does most of the work, but it’s the nib that offers you the ability to perform to your highest potential.
There are A LOT of different calligraphy nibs out there. It seems like for every pen, there’s a nib, and that’s not an exaggeration.
In general, there are two things to consider when buying your nibs separate from your pens:
- Shape.
Flat-shaped nibs don’t hold ink as well as more curved shapes, meaning you’re going to need to do more hand refills more often.
- Tines and Flexibility
When you apply pressure to your nib, the two sides of it part to release the ink; these sides are called the tines. The more flexible these are, the more control your hand has over the shape of your nib, meaning you’re getting more variety in your lettering.
Size of Nibs
As well as the quality of the nib, you need to have a look at what nib sizes you’re buying for your pens, as well.
There is actually a labeling system used by pen manufacturers that offers you the ability to quickly and easily see what size a nib is, as well as what it’s used for.
However, the sizes are not universally standardized. Meaning the sizes for nibs that are labeled the same from two different manufacturers might be different.
There are five different standard sizes of nibs:
A – Rounded nibs designed for beginners. Typically found on a lot of cheaper fountain pen models.
B – Bold calligraphy pen set type that gives you thicker ink writing, resulting in bolder and more robust lettering.
M – Medium-sized lettering that sits in the middle of ink thickness. This is a safe calligraphy pen size that most people can make use of.
F – Fine calligraphy pens with a line width of around 0.6mm. This is better for those that like thin lettering and ink and suits users that use products for smaller handwriting.
EF – Extra fine calligraphy pens. It’s exactly what it says, delivering around 0.4mm lettering and ink thickness, allowing the artist to do quality detail on certain art items.
As well as the five standard types, there are a few different, alternative sizes that make for the best calligraphy pens for specific circumstances:
Italic – Nibs of this variety that come with your calligraphy pen set are flat instead of rounded, and typically both steel made from steel products and is untipped. This allows the artist significantly more control over their hand lettering by giving you the ability to switch between broad and thin ink strokes quickly.
ST- These products are a less extreme version of an italic calligraphy pen set that still gives you that controlled hand lettering but is less demanding of the artist.
EEF – EEF stands for extra-extra-fine. This type of calligraphy pen set is extremely thin, resulting in very small hand lettering and ink release, making it great for small details. This type of calligraphy pen is harder to find than other pens and is typically only found on Japanese pen models.
BB – Double broad calligraphy tips can be found on anything from fountain pen types to brush pens. This type of tip is thick and great for doing hand lettering signatures.
BBB – This is a more extreme version of BB and results in very thick ink trails and hand lettering.
OM/OB- This is a niche calligraphy type meant to be used by the oblique pen holder. The nib is designed to cater to those with unusual writing methods and positions.
LH – LH calligraphy tips are for left-handed users. As such, you can find them for anything from fountain pen models to most kinds of brush pens.
Music – A calligraphy tip type designed for writing music details.
There are a few other calligraphy tip types for the likes of dip and brush pens, all of which have different details, but these are the ones you’re most likely going to come across while browsing.
Ink Cartridges and Ink Flow
It doesn’t matter if you’re using a felt tip pen or a set of brush pens; ink cartridges are going to play a part in your calligraphy. There are lists dedicated to specific types for a reason, all of which account for the variety of purposes that calligraphy caters to.
Generally speaking, the best way to ensure you’re getting some good quality ink is to see what reviews say about that specific model. See if the ink and flow can account for hand lettering, as well as what else it offers.
You can even contact the customer service account of whatever brand you’re buying with to get some more information. Most manufactures have a menu that allows you to find the customer service email address and phone number. Some even have one-button query applications, so don’t be afraid to reach out.
Grip and Comfort
Calligraphy hand-lettering is a surprisingly painful experience. You’re going to be gripping your calligraphy pen in a number of ways for hours, which can seriously strain your hand.
When you’re looking at pens, like the Sheaffer Viewpoint Calligraphy Pen – a favorite of mine, you should see what people are saying about how it feels to grip before you head to the buy menu and order it for shipping.
The Best Calligraphy Pen for Hand Lettering
There is no way for me to tell you what the single best calligraphy pen is for anything, not just hand lettering. You need to take into consideration your skill, location, and budget. If I could give you a button to a menu of all the best pens, I would, but I can’t.
Instead, all I can do is give you the tools needed for you to make your own purchasing decision.
Affiliate Disclosure
In compliance with the FTC guidelines, please assume the following about all links, posts, photos and other material on this website:
Any/all of the links on this website are affiliate links of which The Big Red Illustration Agency receives a small commission from sales of certain items, but the price is the same for you.
www.bigredillustrationagency.com is a participant in the Amazon Services LLC Associates Program, an affiliate advertising program designed to provide a means for sites to earn advertising fees by advertising and linking to Amazon.com & Amazon.co.uk. Pages on this site may include links to Amazon and its affiliate sites on which the owner of this website will make a referral commission.
Cookie preferences: cookie preferences
Adam has made a name for himself in the illustration industry and is a passionate blogger and writer on the subject of art, illustration and graphic design.
His artwork has been featured in countless publications and used for very well-known media projects. As a professional illustrator for over 20 years, Adam's wealth of knowledge and experience enables him to consult and advise artists and illustrators all over the world.


